
Exchange connector
The Thinkwise Exchange Connector is a Windows service application that provides the synchronization of emails, appointments, contacts and tasks between a Thinkwise database and Exchange.
The Thinkwise Exchange Connector communicates via ADO.NET with the end product database, mainly by calling stored procedures. Communication from the database depends on the used RDBMS, with Java stored procedures or CLR procedures to send messages to the Exchange Connector.
The Thinkwise Exchange Connector and Exchange communicate via SOAP Web Services, where the Connector uses the Exchange Web Services (EWS) API 2.0.
The Exchange Connector uses the Exchange AutoDiscover service to find out which Exchange Server a user's mailbox is located on.
It is possible to monitor the Exchange Connector by connecting Telnet to the Thinkwise Exchange Connector application or service.
Architecture
With the Thinkwise Exchange Connector, it is possible to synchronize emails, contacts, tasks and appointments between Exchange and your Thinkwise application. For each user who uses the Thinkwise application, it is possible to set which parts have to be synchronized.
The Thinkwise Exchange Connector works for both SQL Server and DB2 Thinkwise applications. The necessary tables for the Thinkwise Exchange Connector are added to the Thinkwise application with the aid of a base project. More information about base projects is described in the Thinkwise Software Factory manual. With the aid of these tables, all set items are synchronized with the Thinkwise application. Items that are adapted in the Thinkwise application can also be synchronized back to the Exchange server (e.g., appointments).
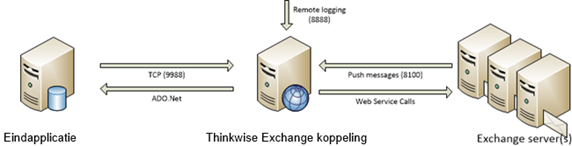
The figure below shows an overview of the Thinkwise Exchange Connector.
 Thinkwise Exchange Connector overview
The Thinkwise Exchange Connector is able to find the relevant Exchange server itself using the AutoDiscover Service. Synchronization is done using SOAP web services that enable communication between the Thinkwise Exchange Connector and the Exchange server.
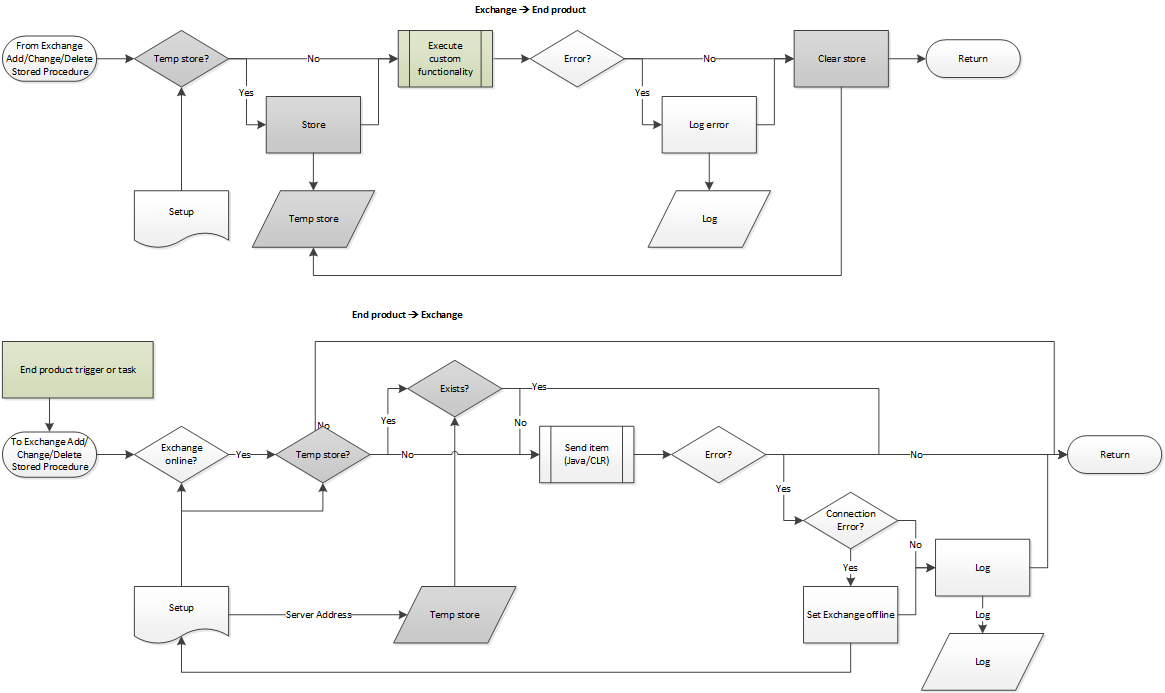
Synchronizing the various items of the Exchange server to the Thinkwise application is done using Stored Procedures on the database of the Thinkwise application. These Stored Procedures are added using a base project added to the database. In addition to the standard operation of these Stored Procedures, additional functionality can be added with the help of templates in the Thinkwise Software Factory to store the incoming items at a desired location in the database. This is further explained in Chapter 5.
Synchronizing the Thinkwise application database to Exchange uses CLR or Java procedures on the database, which send the correct data via JSON over TCP to the Thinkwise Exchange Connector. From the Thinkwise Exchange Connector, data is forwarded to the Exchange Server through SOAP web services.
The base project for the Exchange Connector contains a Stored Procedure called exh_get_users to retrieve users who need to be synchronized. There is also a Stored procedure called exh_sync_users that makes it possible to re-register the users with the Thinkwise Exchange Connector, for example if a new user has been added.
Finally, it is possible to log the activities of the Thinkwise Exchange Connector with, for example, Telnet. This is particularly useful for detecting errors. The Thinkwise Exchange Connector has an automatic error recovery mechanism, which means that the synchronization of items will always continue.
Features
Below are the features of the Thinkwise Exchange Connector:
- You can specify for each user what needs to be synchronized:
- Emails
- Appointments
- Tasks
- Contacts
- Synchronization of email:
- Both incoming and outgoing emails.
- Synchronization of appointments:
- Appointments are synchronized to both the organizer and all participants.
- Synchronization of tasks
- Synchronization of contacts
- Recovery mechanism:
- If the connection with Exchange or the database is lost, the Thinkwise Exchange Connector will restore the connection itself as soon as the connection is back.
- Register users again:
- Users can be re-notified if there are new or modified users.
- Manual synchronization of items:
- Items can not be synchronized due to connection loss, new users or other causes, this is always possible manually afterwards.
Restrictions:
- Updating a calendar item in a Thinkwise application can only be done by its organizer.
- Sending emails via the Exchange Connector from a Thinkwise application is not possible.
Exchange 365
The Connector is also able to communicate with Exchange 365. The first user returned by the exh_get_users procedure has to be the user who can impersonate all other accounts. The Exchange version has to be set to 5 (Exchange2013_SP1). The AutoDiscover service is enabled by default on Exchange 365, so nothing needs to be set up for this.
Attachments
When an item with attachments to the final application database is synchronized, the values of the attachments are sent as a string in a certain format:
<Attachment name 1>: <attachment id 1>; <attachment name 2>: <attachment id 2>;
This does not include the binary data of the attachments.
To retrieve the binary data from an attachment, a separate call to the Thinkwise Exchange Connector has to be made with the user, item ID and attachment ID of the attachment.
To determine the attachment name and attachment ID for this, a table-valued function exh_split_attachment_info is generated when the Exchange 365 base project is linked. This function splits the above attachment string into a table with two columns, after which a cursor can be walked through, for example.
It is not yet possible to add an attachment to an item.
Operation
The Exchange Connector works as follows:
Initialization
- At startup, the configuration file is read out to retrieve the settings, such as database server, schema name, etc.
- After this, a connection is made with the database server and the settings in
exh_set_upare updated (IP address and port of the Thinkwise Exchange Connector). - The Exchange Connector then calls the stored procedure
exh_get_usersto request the users for the emails, appointments, contacts or tasks that have to be synchronized. - For each user, the correct Exchange server is retrieved with the AutoDiscover service, after which a push subscription for the user is requested.
- Based on the watermark saved per user in the
exh_watermarktable, it is checked whether there are new or changed items in Exchange that have not yet been synchronized to the database; these items will still be synchronized. - If the Exchange Connector cannot connect to the database, all subscriptions are stopped. The Exchange Connector then attempts to set up a connection to the database every five minutes. If this succeeds, the process will be resumed from Step 2 onwards.
Synchronization
- Every time an item is added, changed or deleted in Exchange, the Exchange Connector will receive a notification. The Thinkwise Exchange Connector then forwards this change to database by calling a stored procedure. A stored procedure is available for each action and item, for example:
- from_exh_add_email
- from_exh_del_contact
- from_exh_chg_calendar
- For recurring appointments, this stored procedure is called for every occurence, up to the number of times that has been recorded in the configuration file.
- If an appointment, contact, email or task is added, modified or deleted in the database, a stored procedure is called, which then calls one of the Java or CLR procedures to send a message to the Exchange Connector. These stored procedures are, for example:
- to_exh_del_calendar
- to_exh_add_contact
- to_exh_chg_task
- The stored procedures return the Exchange Item ID that is stored with the record in the final application.
The following diagram shows the process of synchronizing an item from and to Exchange:
Registering users
By calling the exh_sync_users stored procedure, the Exchange Connector re-registers all users at Exchange. This stored procedure could, for example, be invoked from a trigger on the user table. If a user is added or modified, this stored procedure will re-register all users, so that the new or modified user will also receive all the correct data.
declare @exit_code int;
declare @output_value varchar(max);
declare @error_message varchar(max);

exec @exit_code = exh_sync_users @output_value output, @error_message output

if @exit_code != 0
begin
  -- log @error_message etc.
end
Syncing items
With the exh_sync_item stored procedure, it is possible to re-synchronize (part of) the Exchange items to the database (for example, after long-term disruptions or for new users).
This stored procedure can be given a user name for which the items have to be synchronized. It can also be indicated which items should be synchronized: Agenda items (0), contacts (1), emails (2) or tasks (3). In addition, it can be indicated between which dates these items should fall and whether additional, modified or removed items have to be included.
For example:
declare @return_value int;
declare @exh_return_value exh_return_value;

exec @return_value = [exh_sync_item]
    @exh_sync_direction = 0,
    @exh_user = 'user@mycompany.com',
    @exh_item = 3, /* tasks */
    @exh_add = 1,
    @exh_chg = 1,
    @exh_del = 1,
    @exh_created_from = '2014-10-20',
    @exh_created_until = NULL,
    @exh_modified_from = '2014-10-20',
    @exh_modified_until = NULL,
    @exh_received_from = '2014-10-20',
    @exh_received_until = NULL,
    @exh_start_from = '2014-10-20',
    @exh_start_until = NULL,
    @exh_return_value = @exh_return_value output;
In the exceptional case you need to re-synchronize changes in the database to Exchange, it is necessary to provide the required business logic in the corresponding exh_get_item procedures.
System requirements
The following components are required before the Thinkwise Exchange Connector can be installed:
- Microsoft Exchange 2007 SP1 or higher configured with:
- Exchange Web Services (EWS)
- AutoDiscovery (Service Connection Point lookup)
- A user with impersonation rights
- Windows server on which the Thinkwise Exchange Connector can run that:
- Contains the .Net Framework
- Can connect with Exchange (via EWS) and with the database of the Thinkwise application
- Runs the service under the aforementioned account with impersonation rights
- Has firewall exceptions configured for the used ports:
- Database listener: 9988
- Exchange listener: 8100
- Telnet logging: 8888
Installation
A number of components are required for the installation of the Thinkwise Exchange Connector:
- Assemblies on the database (SQL Server Thinkwise applications)
- Java files on database server (DB2 Thinkwise applications)
- Exchange base project
- Exchange Connector service
The installation of each part is explained in the chapters below.
Assemblies (SQL Server)
The Exchange connector uses CLR procedures to communicate with the database. The CLR integration feature of SQL Server is off by default, and must be enabled first using the following command:
sp_configure 'show advanced options', 1;
GO
RECONFIGURE;
GO
sp_configure 'clr enabled', 1;
GO
RECONFIGURE;
GO
To enable CLR integration, you must have ALTER SETTINGS server level permission, which is implicitly held by members of the sysadmin and serveradmin fixed server roles.
Two assemblies have to be installed on the database using an asymmetric key and a login on the database server. The required files are:
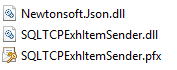
These have to be created on the Master database. No existing login may be used. The dll and pfx files first have to be placed on the server in a folder that SQL Server can access. This folder has to have full access rights for everyone, as well.
USE master
GO

CREATE ASYMMETRIC KEY SQLTCPExhItemSender
FROM EXECUTABLE FILE = 'M:\temp\SQLTCPExhItemSender.dll' --assembly dll
GO

CREATE LOGIN SQLTCPExhItemSender FROM ASYMMETRIC KEY SQLTCPExhItemSender
GO
Provide external access for the created login.
USE master
GO

GRANT EXTERNAL ACCESS ASSEMBLY to SQLTCPExhItemSender
GO
The next step is also to create the newly created user on the project database.
USE [project_database]
GO

CREATE USER SQLTCPExhItemSender FOR LOGIN SQLTCPExhItemSender
GO
Now create the assembly with external access permission. Make sure that the DLL is accessible from the database server.
USE [project_database]
GO

ALTER DATABASE [project_database] SET TRUSTWORTHY ON
GO

USE [project_database]
GO
This NewtonSoft library is required before the SQLTCPExhItemSender can be installed. The CLRs can be safely installed as UNSAFE because they are signed with a certificate.
If the database is reset, the db_owner has to be set correctly, otherwise these assemblies will no longer work. The db_owner must have the server_role sys_admin.
CREATE ASSEMBLY [Newtonsoft.Json] FROM 'M:\temp\Newtonsoft.Json.dll' -- path to dll
WITH PERMISSION_SET=UNSAFE
GO

CREATE ASSEMBLY SQLTCPExhItemSender FROM 'M:\temp\SQLTCPExhItemSender.dll' -- path to dll
WITH PERMISSION_SET=UNSAFE
GO
More information on PERMISSION_SET access can be found here.
Java files (DB2)
For DB2 Thinkwise applications that want to use the Exchange Connector, the supplied jar files have to be installed on the database server:
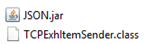
The supplied jar files have been compiled with the target Java 1.6. If these are not yet available, they can be built with ant. Go with the command line to the DB2 folder where build.xml is located and call ant. These two jars are available in the out> target folder.
To install the jar files, perform the steps in the example below. In this example, EXH_300 is used as the schema where the files are to be installed.
Copy the jar-files to the database server (for example
Root/home/EXH_300).Open a SQL window to execute queries.
Call the
sqlj.install_jarprocedure to install the jar-files in the schema.call sqlj.install_jar('file:/home/EXH_300/TCPExhItemSender.jar', 'EXH_300.TCPExhItemSender', 0); call sqlj.install_jar('file:/home/EXH_300/gson-2.7.jar', 'EXH_300.Gson', 0); commit;Check if the QSYS2.SYSJAROBJECTS-table contains both of the jar files for the schema.
select * from QSYS2.SYSJAROBJECTS;
After performing these steps, a TCPEXHITEMSENDER.jar and GSON.jar will have been placed in the following folder:
Root/QIBM/UserData/OS400/SQLLib/Function/jar/EXH_300
The jar files at this location should not be deleted manually. Use
sqlj.remove_jarfor this. For more information, see this link.
Exchange base project
The Exchange connector is added to a project by including the EXCHANGE base project in your application.
Additional tables are generated by adding the base project, which influences the existing database of the Thinkwise application. Before the base project can be added, a new project version first has to be created for the project (see Software Factory manual).
For DB2 applications, the DB2_EXCHANGE_365 base project needs to be linked and for SQL Server applications, the SQLSERVER_EXCHANGE_365 base project.
Add the base project in the Software Factory:
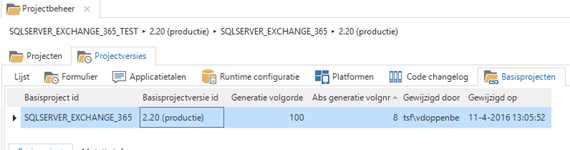 Linking the base project
If the project has now been generated and executed, additional tables and procedures will have been added to the database. These are required to receive and manage the Exchange data that can come from the Thinkwise Exchange Connector.
The base project does not provide the tables to actually store the synchronized data, it only contains a temporary table that is emptied after each action with the Thinkwise Exchange Connector. So, for example, the email items themselves have to be created with a table with, for instance, the name email_item. This should contain the same columns as the temporary table, which can easily be copied in the SF.
The table can then be filled with the synchronized data by filling in the exh_from_exh_ stored procedures.
Exchange Connector service
Now that the base project is linked to the Thinkwise application, the Thinkwise Exchange Connector can be installed. The necessary steps are explained in the following subchapters.
Installation
The Exchange Connector is installed with the MSI setup file supplied by Thinkwise. A connection string can be specified during the installation (this can also be done afterwards).
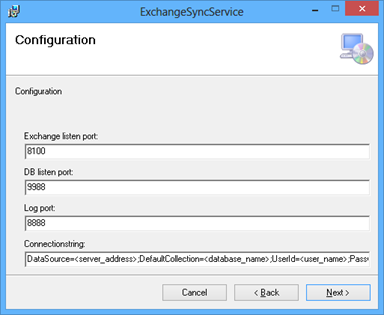 Exchange Sync Service
The credentials of the impersonation user have to be entered to install the service. The service is also started later with the same user.
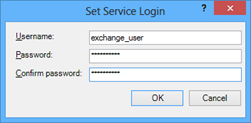 Set Service Login
The service can be installed multiple times on the same server to monitor different databases. To do this, make a copy of the installation folder and adjust the configuration. With the following command, the service can be installed under a different name (as administrator):
sc.exe create SecondExchangeService
  binpath=c:\ExchangeSyncService\ExchangeSyncService.exe
To delete the service:
sc.exe delete SecondExchangeService
Configuration
The Thinkwise Exchange Connector is configured using the ExchangeSyncService.exe.config file, containing the following settings:
Mandatory settings
- LogPort
- Port on which a Telnet connection can be made to view the log feed.
- DatabaseListenPort
- Port on which the database creates TCP connections to pass updates.
- DatabaseType
- iSeries
- SQLServer
- HtmlBody
- Use HTML for body text, true/false
- MaxBodyLength
- Maximum number of characters to use for body text
- ExchangeConcurrencyLevel
- Concurrent number of threads to connect to Exchange
- EnableSCPLookup
- Use SCP to locate the AutoDiscover URL, true/false
- ExchangeTimeout
- Timeout in milliseconds
<connectionStrings>- Connectionstring to use to connect to the database.
- For DB2 databases, add the following parameters to the connectionString to prevent communication errors:
CheckConnectionOnOpen=trueEnablePreFetch=false
Optional settings
- MaxSyncedRecurrences
- Maximum number of recurrences to sync for recurring appointments. When 0 or empty, only the master-appointment is synced.
- ImpersonationUser
- The username of the impersonation user, e.g., serviceaccount@domain.com
- ImpersonationPassword
- The password of the impersonation user
- IgnoreSSL
- To (temporarily) ignore SSL certificate issues, true/false
- MeetingRequestsResponses
- To sync emails for meeting requests and responses, true/false
Monitoring
The Exchange Connector can be monitored with Telnet. To do this, set up a connection with the Exchange Connector server to the port specified at installation or in the configuration file:
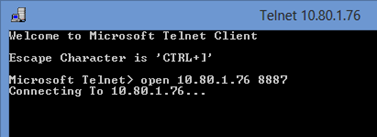 Setup a Telnet connection
With more advanced Telnet applications, such as PuTTy, this logging can also be written to a file.
Testing
To test whether the Thinkwise Exchange Connector works properly, the Connector, of course, has to be started. If this user has logged in correctly, it will respond to all events of this user.
To test whether the agenda items are properly synchronized, an agenda item has to be created in the agenda of the user in question. The Thinkwise Exchange Connector will then capture this event and eventually call the exh_from_exh_add_calendar_item stored procedure.
It will process the data according to its own implementation and store it, for example, in the custom table calendar_item. If this flow goes well, it will be clear that the Thinkwise Exchange Connector is working well. If the testing fails, the workflow overview can be used to see where the problem is.
Implementation
If after testing it appears that everything is functioning properly, the Thinkwise Exchange Connector can be put into use. The ExchangeSync service can be set to Auto start in the Windows services configuration so that it always starts when the server starts.
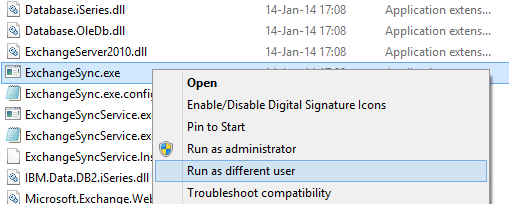
The Thinkwise Exchange service can also be executed as a console application. This means that a command prompt opens and all actions that the Connector does are followed. This can be done by running ExchangeSync.exe under the account that has impersonation rights. However, it is necessary to set up the file ExchangeSync.exe.config correctly. These settings can be copied from the file ExchangeSyncService.exe.config
 Starting a console application with impersonation
Business logic
Below are a number of sample templates that can be used to provide the required business logic for the Exchange connector. These templates can be created in the Software Factory and have to be adapted to your application. For example, the correct name for the tables must be selected.
⚠ Exchange item IDs are case sensitive! When comparing item IDs on SQL Server, use a case sensitive collation, for example Latin1_General_CS_AS.
These procedures return the following information about the call to the Exchange Connector:
An
exit_codewhich indicates whether the procedure has been carried out successfully, see below.An
output_valuethat returns the result of the call, for example the Exchangeitem idafter synchronizing an item to Exchange.An
error_messagecontaining the message in case of an error.
Possible exit codes:
| Exit code | Cause |
|---|---|
| 0 | The procedure has been executed without any problem. It is possible to use the output value. |
| 1 | A general error has occurred. Check the value of the error_message for more information. |
| 521 | The Exchange Connector is offline. Check if the Exchange Service is running and if it can connect to the database. |
| 522 | Connecting to the Exchange Service failed. Check the value of the error_message for more information. |
User registration
The Exchange Connector retrieves the users that need to be synchronized from the end product by calling the stored procedure exh_get_users. It is important that the watermark from the exh_watermark table is also returned.
select
    u.exh_user,
    w.exh_watermark_calendar,
    w.exh_watermark_contact,
    w.exh_watermark_email,
    w.exh_watermark_task,
    u.sync_calendar,
    u.sync_contact,
    u.sync_email,
    u.sync_task
from [my_user_table] u
left join exh_watermark w
  on w.exh_user = u.exh_user
From Exchange to the database
The Exchange Connector calls the exh_from_exh stored procedures for new or changed items.
Create and update
if exists (
    select 1
    from [my_calendar_table]
    where @exh_user = exh_user
      and ((exh_item_id collate Latin1_General_CS_AS = @exh_item_id)
           or (exh_item_id is null and exh_app_item_id = @exh_app_item_id))
)
begin
    update [my_calendar_table]
    set
        exh_item_id = @exh_item_id,
        exh_user = @exh_user,
        exh_subject = @exh_subject,
        ...
        exh_attachments = @exh_attachments
    where @exh_user = exh_user
      and ((exh_item_id collate Latin1_General_CS_AS = @exh_item_id)
           or (exh_item_id is null and exh_app_item_id = @exh_app_item_id))
end
else
begin
    insert into [my_calendar_table]
    (
        exh_item_id,
        exh_user,
        exh_subject,
        ...
        exh_attachments
    )
    values
    (
        @exh_item_id,
        @exh_user,
        @exh_subject,
        ...
        @exh_attachments
    )
end
Delete
delete from [my_calendar_table]
where @exh_user = exh_user
 and ((exh_item_id collate Latin1_General_CS_AS = @exh_item_id)
      or (exh_item_id is null and exh_app_item_id = @exh_app_item_id))
From the database to Exchange
To sync database records to Exchange, call the exh_to_exh procedures, for example from triggers.
Create, update and delete
declare @exit_code int;
declare @error_message varchar(500);
declare @message varchar(1000);

declare @_exh_app_item_id exh_app_item_id;
declare @_exh_item_id exh_item_id;
declare @_exh_user exh_user;
declare @_exh_subject exh_subject;
...
declare @_exh_attachments exh_attachment_info;

declare trigger_cursor cursor for
select
    exh_app_item_id,
    exh_item_id,
    exh_user,
    exh_subject,
    ...
    exh_attachments
from inserted

open trigger_cursor
fetch next from trigger_cursor into
    @_exh_app_item_id,
    @_exh_item_id,
    @_exh_user,
    @_exh_subject,
    ...
    @_exh_attachments

while (@@fetch_status = 0)
begin
        execute @exit_code = exh_to_exh_chg_calendar
            @_exh_app_item_id,
            @_exh_item_id,
            @_exh_user,
            @_exh_subject,
            ...
            @_exh_attachments,
            null,
            @error_message output;

        if (@exit_code != 0)
        begin
           set @message = '<text>' + @error_message + '</text>';
           exec tsf_send_message 'exchange_message_id', @message, 1;
           rollback;
           return;
        end

    fetch next from trigger_cursor into
        @_exh_app_item_id,
        @_exh_item_id,
        @_exh_user,
        @_exh_subject,
        ...
        @_exh_attachments
end

close trigger_cursor
deallocate trigger_cursor
Download attachments
Attachments added to items in Exchange are sent to the final application database in the following way:
<Attachment name 1>: <attachment id 1>; <attachment name 2>: <attachment id 2>;
To retrieve the actual (binary) data from the attachment, the sendGetAttachment procedure again has to make a call to the Exchange Connector.
To call this procedure, it is necessary to provide the user, item ID and attachment ID of the attachment.
For SQL Server, there is also a saveAttachment procedure to assist in writing the data to a file. Keep in mind that this is done from the database server. If a user were allowed to fill this in and store the attachment somewhere on the C: \ drive, this would happen on the server and not on the user's computer.
declare @exchange_ip_address nvarchar(20)
declare @exchange_ip_address_port int
declare @exit_code int
declare @byte_array varbinary(max)
declare @error_message nvarchar(max)

set @exchange_ip_address = (
    select exh_value
    from exh_set_up
    where exh_parameter = 'exh_ip_address');

set @exchange_ip_address_port = (
    select exh_value
    from exh_set_up
    where exh_parameter = 'exh_ip_address_port');

declare @exh_attachment_id exh_item_id
declare @exh_attachment_name exh_information

declare attachment_cursor cursor for
select exh_attachment_id, exh_attachment_name
from exh_split_attachment_info(@exh_attachments)

open attachment_cursor
fetch next from attachment_cursor into @exh_attachment_id, @exh_attachment_name

while (@@fetch_status = 0)
begin
    exec @exit_code = sendGetAttachment @exchange_ip_address,
        @exchange_ip_address_port, @exh_item_id, @exh_attachment_id,
        @exh_user, @byte_array output, @error_message output

    if (@exit_code = 0)
    begin
        exec saveAttachment @save_directory, @exh_attachment_name,
            @byte_array, @overwrite, null
    end
    else
    begin
       set @message = '<text>' + @error_message + '</text>';
       exec tsf_send_message 'exchange_message_id', @message, 1;
       rollback;
       return;
    end

    fetch next from attachment_cursor into @exh_attachment_id, @exh_attachment_name
end

close attachment_cursor
deallocate attachment_cursor
Points of attention
When working with the Thinkwise Exchange Connector, please consider the following points of attention:
⚠ Exchange item IDs are case sensitive. When comparing item IDs on SQL Server, use a case sensitive collation, for example Latin1_General_CS_AS.
Define body fields on SQL Server as VARCHAR(MAX) or NVARCHAR(MAX), especially when using HTML. For DB2, use VARGRAPHIC or DBCLOB for characters.
The EWS certificate must be valid.
The Thinkwise Exchange Connector does not work with aliases, only with original accounts.
To test the AutoDiscover and impersonation account, use this online Microsoft tool: https://www.testexchangeconnectivity.com/
When viewing the log feed via the console or via a TCP connection, filters can be placed on the type of message by typing the letters of the required messages:
- Errors
- Warnings
- Actions
- Messages
For example:
ew <enter>
The log is not written to a file by default. Putty can be configured to write the output of a Telnet session to a file.
In the event of a crash or a crash of the Exchange Connector, create a memory dump of the ExchangeSyncService process (via the task manager) to assist Thinkwise in debugging the error.
The Exchange Connector distinguishes between NULL and an empty string:
- NULL: leave value unchanged
- Empty string: clear value
For appointments with required or optional attendees: the appointments are created with the same app_item_id. It is therefore necessary to filter on
exh_userin thefrom_exhprocedures.
Troubleshooting
If there are problems with the Thinkwise Exchange Connector, there may be a number of causes. Use the following instructions to identify the problem.
Service
Verify that the ExhangeSyncService runs under Windows Services. If this is not the case, it can be (re)started using Windows Services or via the procedure described here.
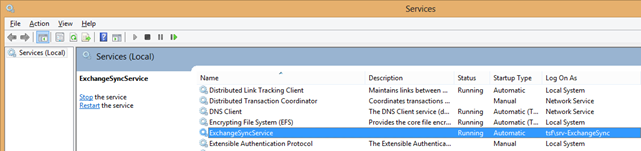 ExchangeSyncService
Access Denied Exception
If the following Access Denied Exception occurs, the http-service endpoint is not correctly registered:
An unhandled exception of type System.ServiceModel.AddressAccessDeniedException
occurred in System.ServiceModel.dll

Additional information: HTTP could not register URL http://+:9008/Notification/.
Your process does not have access rights to this namespace (see
http://go.microsoft.com/fwlink/?LinkId=70353 for details).
This can be solved by executing the following command in an Administrator console:
netsh.exe http add urlacl url=http://+:8100/ExchangeSync user=domain\username
Console application
The Thinkwise Exchange service can also be executed as a console application. This means that a command prompt opens and all actions that the Connector are followed. This can be done by running ExchangeSync.exe under the account that has impersonation rights, see here.
During the execution of the work, any errors are shown in the console window which may explain the problem. Some known error messages are described in the table below. For an overview of all possible Exchange Web Services error messages, see:
| Error | Cause/solution |
|---|---|
| A communication error occurred. | No connection can be made to the database. Check whether the database can be reached with the connection string specified in App.config and restart the Exchange Connector. |
| Access is denied. Check credentials and try again. | The user or the impersonation user does not have the correct rights. |
| Alternative contact folder could not be found. Unable to create subfolder. The user account does not have the right to create subfolders. | The public contacts folder cannot be found and created. This message can be ignored. |
| DB Connection lost. | The connection to the database has been lost. Check the status of the final application database and restart the Exchange link. |
| DBHandler.ProcessItem: CHG/ADD/DEL Shared.CalendarItem | The appointment cannot be saved or deleted. The complete error provides more information about the cause, for example, if the table is locked. |
| ExchangeHandler.ProcessItem: CHG Shared.ContactItem 1881 The Id is invalid. | The contacts are not yet synchronized with the Exchange servers, so the IDs are incorrect. This message can be ignored. |
| Failed to resubscribe user. | The user cannot be logged on to Exchange. Check that the Exchange server is online, the user's email address is correct and restart the Exchange link. |
| No user was specified for add/chg/del action ... | Exchange tries to modify an item without the user being specified. |
| Unknown user. | The user is not known to Exchange. Check the email address and restart the Exchange Connector. |
| Mailbox move in progress. Try again later. | A mailbox move is in progress. Wait until the move is completed and try again. |
| Object cannot be deleted. | The item cannot be deleted. This message can be ignored. |
| The Autodiscover service couldn't be located. | The Autodiscover service is not correctly set up. Restore this and restart the Exchange Connector. |
| The Autodiscover service returned an error. | The Autodiscover service is not correctly set up. Restore this and restart the Exchange Connector. |
| The operation has timed out. | Cannot connect to the Exchange server. Check the Exchange Server and restart the Exchange Connector. |
| The specified object was not found in the store. | The appointment, email or contact person has been removed again after adding or changing. This message can be ignored. |
| The underlying connection was closed: Could not establish trust relationship for the SSL/TLS secure channel. | There is a problem with the network, for example the certificates. Restore this and restart the Exchange Connector. |
| Too many automatic redirections were attempted. | There is a problem with the network, for example the load balancing. Restore this and restart the Exchange Connector. |
File not found (DB2)
If the TCPExhItemSender.class does not work, it may be compiled with a different Java version than the version on the server.
In this case, the original TCPExhItemSender.java file needs to be compiled via an IBM session window.
Place the
.javafile in the same folder as the.classfile:Root/QIBM/UserData/OS400/SQLLib/FunctionDelete the
.classfile but keep theJSON.rarfile.In a session window, start the QSH Command Entry program via Programmer Menu > Run a Command > Program Commands > Java Commands > QShell Interpreter Commands > Start QSH > QSH Command Entry
Compile the
.javafile using the following command:javac TCPExhItemSender.java -classpath JSON.jar
After this, the file will be compiled and there will then be a new .class file which is compiled with the Java version of the server.
The execute rights have to be set for this new file.
AutoDiscover does not work
If AutoDiscover does not work even though all settings are correct, Windows Firewall may block the calls from the Connector. In this case, either the Windows Firewall has to be disabled or a rule added that gives the Connector access. When using Office 365, it is mandatory to fill the StaticEwsUrl as indicated in the Connector configuration. The value is always the same for Office 365: https://outlook.office365.com/ews/Exchange.asmx
Other issues
Restart the Exchange Connector
Problems can often be remedied by restarting the Connector. This can be done via the Windows Services or by executing the following command in a command prompt:
net stop ExchangeSyncService && net start ExchangeSyncService
After restarting, it takes a few minutes for all users to be registered. It can then still take a long time to process all Exchange items that have accumulated, depending on the time that the Connector has not worked.
Re-register the users
If the problems with the Connector do not occur to all users, it may be sufficient to re-log the users to the Connector. See here.
Resync the items
If the Exchange service has not worked for a period of time, it is possible to synchronize the items that have been sent in the meantime. This is possible with the task exh_sync_items.