
Indicium
Indicium is a .NET Core application which means that it is capable of hosting itself with a built-in web server. However, for security and management reasons, we do not recommend exposing the built-in web server in production environments. Instead, we recommend hosting Indicium behind an IIS proxy, since IIS is rich in features and offers great management tools. This chapter will explain how Indicium can be integrated in an IIS proxy.
Prerequisites
There are a couple of prerequisites that need to be met before Indicium can be installed on IIS. This chapter will describe all of the necessary steps.
.NET Framework
Indicium is built with version 4.7.2 of the .NET Framework. As such, this is the minimum version of the .NET Framework that needs to be installed on the web server. If the web server has a lower version of the .NET Framework, or none at all, then use the following link to install the latest version of the .NET Framework: https://www.microsoft.com/net/download/thank-you/net472.
.NET Core Windows Server Hosting Module
To facilitate the integration of Indicium in IIS, it is necessary to install Microsoft's .NET Core Windows Server Hosting Module on the web server. This module enables IIS to take control of starting and stopping Indicium, amongst other things. To check if the module has already been installed, open Modules on a website in the IIS Manager.
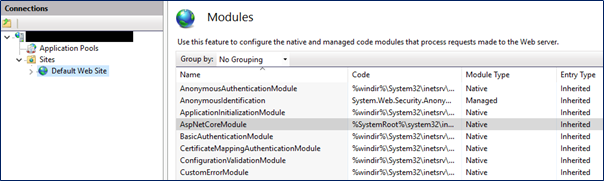
If the module has not been installed yet, then use this link to install it: https://dotnet.microsoft.com/download/thank-you/dotnet-runtime-2.2.7-windows-hosting-bundle-installer.
URL Rewrite Module
Finally, it is necessary to install Microsoft's URL Rewrite Module for IIS. URL rewriting is a feature that is not available in IIS by default, though it is necessary to facilitate the integration of Indicium. The availability of this module can also be checked in the IIS Manager, much like the previous module.
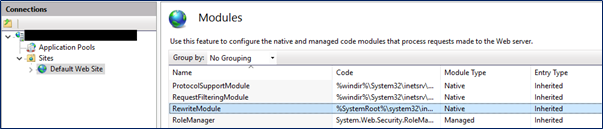
If the URL Rewrite module has not been installed yet, then use the link below to install it: https://www.iis.net/downloads/microsoft/url-rewrite.
Creating an Application Pool
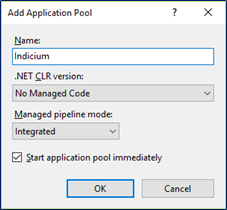
As stated earlier, Indicium is capable of hosting itself and IIS is merely used as a proxy to expose Indicium to the network and/or the internet. As such, all the heavy lifting is performed by Indicium's own web server and the Application Pool in IIS does not even need to initialize a .NET runtime. Because of this, it is wise to select No Managed Code when creating an Application Pool for Indicium, as it will positively affect the start up time.
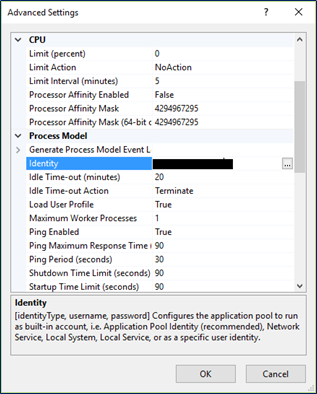
After creating the Application Pool, it is necessary to open the settings of the Application Pool and configure an Identity which has sufficient permissions to read/write from/to all the relevant disk locations. What these disk locations are depends on where the application stores its images and other files, and to which locations the application can upload files.
Creating the Web Application
Copy the Indicium binaries and other files to the desired location on the web server. Typically, this location will be something like
C:\inetpub\wwwroot\indicium. Next, open the appsettings.json file with a text editor (as Administrator) to configure the connection to the IAM database.
Indicium handles authentication and authorization internally and will perform all database traffic with a single user, the Database Pool user. If you do not want the Database Pool User to be the same as the Application Pool user in IIS, then you can choose to override it by means of the PoolUserName and PoolPassword properties in the appsettings.json file.
Contrary to versions 2018.2 and earlier, the Database Pool user does not need to be created as a user in IAM. The Database Pool user only needs full access to all the databases present in IAM, including the IAM database itself. None of the end users accessing the applications require any physical permissions on any database. Users using RDBMS authentication do need to be created since they will be authenticated by attempting to open a connection to the meta-database.
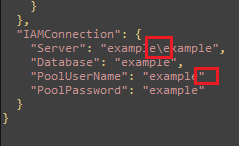
Double quotes (
") and backslashes (\) in the appsettings.json file, for instance in usernames or the server address, need to be escaped by an extra backslash. For example:server\instanceshould beserver\\instance.
{
  "Logging": {
    "IncludeScopes": false,
    "LogLevel": {
      "Default": "Information",
      "System": "Information",
      "Microsoft": "Warning",
      "Indicium": "Debug"
    }
  },
  "MetaSourceConnection": {
    "Server": "[server]",
    "Database": "[iam_database]",
    "PoolUserName": "[username]",
    "PoolPassword": "[password]"
  }
}
Finally, create a new Web Application in the IIS Manager and choose an alias, the created Application Pool and the physical path to Indicium.
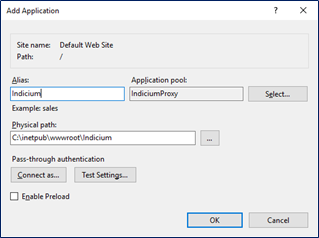
The Web Application will attempt to listen on port 80 by default. If this port is already in use, then it is necessary to choose another port.
When done, the Web Application can be started. Open a browser and navigate to https://server/indicium/ to verify that Indicium is running and configured correctly.
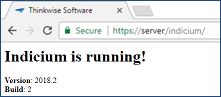
If you do not get a result like the image above, then please refer to Troubleshooting below for steps to resolve your problem.
Enable changing and resetting passwords
As of version 2018.2.1, Indicium supports changing and resetting passwords for users with IAM authentication. However, for resetting passwords to work, Indicium needs to be able to send emails to users, which requires some additional configuration.
To enable the reset password feature, add the following template to the appsettings.json file and fill it out.
{
  "Email": {
    "SmtpServer": "[server]",
    "SmtpPort": 25,
    "UseSSL": true,
    "SmtpUsername": "[username]",
    "SmtpPassword": "[password]",
    "PasswordResetTemplate": {
      "FromEmail": "[email]",
      "FromDisplay": "[name]",
      "Title": "Password reset token",
      "Body": "Your password reset token is <b>{resetToken}</b>."
    }
  }
}
The reset password feature also requires the email address of users to be configured in IAM.
For instructions on how to start a Mobile GUI against Indicium, see here.
SMS Two-Factor Authentication
As of version 2019.2.1, Indicium supports SMS authentication. This feature is especially useful for users with old mobile devices and no internet. Configure a user in IAM to have Password and SMS login verification. Enter the phone number of a phone you have access to and make sure you're using the international number format (e.g. +311234....). Also ensure the provider phone number is a global SMS-capable number so it can send messages internationally.
To enable SMS two-factor authentication, just add the following template to the appsettings.json file and fill it out.
{
  "SMS": {
    "Username": "[AccountSID]",
    "Password": "[AuthToken]",
    "FromPhoneNumber": "[PhoneNumberProvider]",
    "DefaultTwoFactorTokenTemplate": "Your validation code is {twoFactorToken}.",
    "TwoFactorTokenTemplates": {
      "NL": "Uw validatiecode is {twoFactorToken}",
      "ENG": "Your validation code is {twoFactorToken}."
    }
  }
}
Currently we only support Twilio to communicate as SMS provider. We will support more providers soon.
Enable Cross-Origin Resource Sharing (CORS)
By default, the Indicium Application Tier only allows requests coming from the same origin (domain). To enable cross-origin requests, add the allowed origin(s) to the appsettings.json file:
{
  "AllowedOrigins": [
    "[https://www.mydomain.com]",
    "[https://www.otherdomain.com]"
  ]
}
Reverse Proxy Settings
Indicium can be used in a reverse proxy setup by taking advantage of the X-Forwarded-* headers mechanism.
These headers include:
-
- Should contain the original IP address of the client that is making the request.
This header is mostly used for logging purposes only and not really needed by Indicium itself. The presence of this header can however trigger a verification check to assert that a request was sent by a trusted reverse proxy server.
-
- Used to tell Indicium what the host name of Indicium is from the client's point of view.
This header is needed to correctly generate things such as redirect urls.
-
- Contains the protocol (HTTP/HTTPS) that was used in the original request.
This header is needed, for example, in situations where the public facing server is configured to force https but Indicium itself is only setup to use http. The public facing proxy server would send this header with a value of
httpsto the internal Indicium, which would then know that any public facing urls in responses must also use the https scheme.
Configuring appsettings.json
To make an Indicium installation aware that it is going to be used in a reverse proxy setup, some settings must be added to the appsettings.json configuration file.
These settings must be added to a ReverseProxy section on the root level of the config file.
The reverse proxy feature must also be explicitly enabled by setting Enabled to true:
{
  "ReverseProxy": {
      "Enabled": true
  }
}
Allowing headers
To specify which of the X-Forwarded-* headers are allowed to be consumed by Indicium change the AllowedHeaders section with the desired combination of the values below:
{
  "ReverseProxy": {
    "AllowedHeaders": [
      "XForwardedHost",
      "XForwardedProto",
      "XForwardedFor",
      "All"
    ]
  }
}
The All value is a shortcut to allow all three headers.
By default only XForwardedFor and XForwardedProto are allowed.
Overriding header names
To override the header names that Indicium should listen to for X-Forwarded-* values use the CustomHeaders section:
{
  "ReverseProxy": {
    "CustomHeaders": {
      "XForwardedHost": "CUSTOM-FORWARDED-HOST",
      "XForwardedProto": "CUSTOM-FORWARDED-PROTO",
      "XForwardedFor": "CUSTOM-FORWARDED-FOR"
    }
  }
}
Restrict X-Forwarded-Host values
To restrict which host domains are allowed as values in the X-Forwarded-Host header use the AllowedHosts section:
{
  "ReverseProxy": {
    "AllowedHosts": [
      "www.example.com",
      "*.example.com"
    ]
  }
}
Host values are subject to the following rules:
- Values are compared using ordinal-ignore-case.
- Port numbers must be excluded.
- If the list is empty, all hosts are allowed.
- A top-level wildcard * allows all non-empty hosts.
- Subdomain wildcards are permitted but don't match the root domain. For example, *.example.com matches the subdomain foo.example.com but not the root domain example.com.
- Unicode host names are allowed but are converted to Punycode for matching.
- IPv6 addresses must include bounding brackets and be in conventional form (for example, [ABCD:EF01:2345:6789:ABCD:EF01:2345:6789]). IPv6 addresses aren't special-cased to check for logical equality between different formats, and no canonicalization is performed.
Failing to restrict the allowed hosts may allow an attacker to spoof links generated by the service.
By default all hosts are allowed.
Specify trusted proxies
By default Indicium only accepts X-Forwarded-For header values from proxies running on the same server.
To grant other servers access specify their IP address in the KnownProxies section:
{
  "ReverseProxy": {
    "KnownProxies": [
      "10.60.0.185"
    ]
  }
}
Specify trusted networks
In addition to trusting proxies by specific IP it is also possible to grant multiple servers access by specifying network ranges using CIDR notation in the KnownNetworks section:
{
  "ReverseProxy": {
    "KnownNetworks": [
      "10.60.0.0/16"
    ]
  }
}
The above states a network IP 10.60.0.0 with a mask of 255.255.0.0.
This would allow servers in the IP range 10.60.0.1 - 10.60.255.254 to send X-Forwarded-For headers.
Changing the path base of Indicium
Assume for a moment that there is an Indicium running on a server named internalserver.
In addition to that there is a external facing proxy server named revproxy.
The revproxy server is configured to accept https requests on port 443 for domain www.example.com.
It sends the requests it recieves to the the Indicium running on an IIS server at internalserver.example.com/indicium.
Because Indicium is running in the virtual app domain /indicium any requests that generate redirects or paths to static images etc. will be returned to the client as www.example.com/indicium/<request remainder>.
Since the reverse proxy acting as www.example.com is rerouting anything after the main domain to internalserver.example.com/indicium the actual request to the Indicium server becomes internalserver.example.com/indicium/indicium/<request remainder>.
This breaks a lot of things, including logging in via /account/ui/login.
To fix this issue, specify the path base according to the externally facing server using the ExternalPathBase option:
{
  "ReverseProxy": {
    "ExternalPathBase": "/"
  }
}
When Indicium recieves a request and detects that the host was changed using the X-Forwarded-Host header, it will also change the path base of the request to what was specified in ExternalPathBase.
In the above example internal requests that are made directly to the Indicium server will continue to use /indicium as the path base since those should not be sending the X-Forwarded-Host header.
Because the revproxy server running for www.example.com should send this header (to change the host back to www.example.com from internalserver.example.com), the path base is changed to / which fixes the url responses that the Indicium server generates since it now assumes that it is running on the server root.
Configuring IIS as a reverse proxy
To use IIS as a reverse proxy the following modules must be installed on the server:
X-Forwarded-For
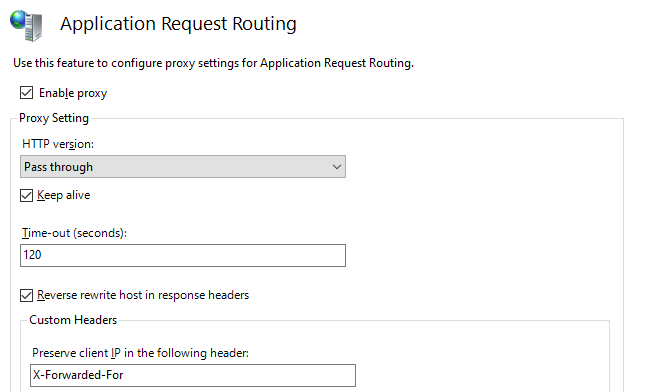
To configure IIS to send the X-Forwarded-For header when Application Request Routing is triggered go to Application Request Routing Cache -> Server Proxy Settings from the main server menu.
In this screen there is a Custom Headers section with a field called Preserve client IP in the following header.
Set the value of this field to X-Forwarded-For (Note: it might already be configured this way after installing ARR).
X-Forwarded-Host/Proto
Pick or add a site to use as the reverse proxy.
In this example a new site was added that was bound to use http on port 10100.
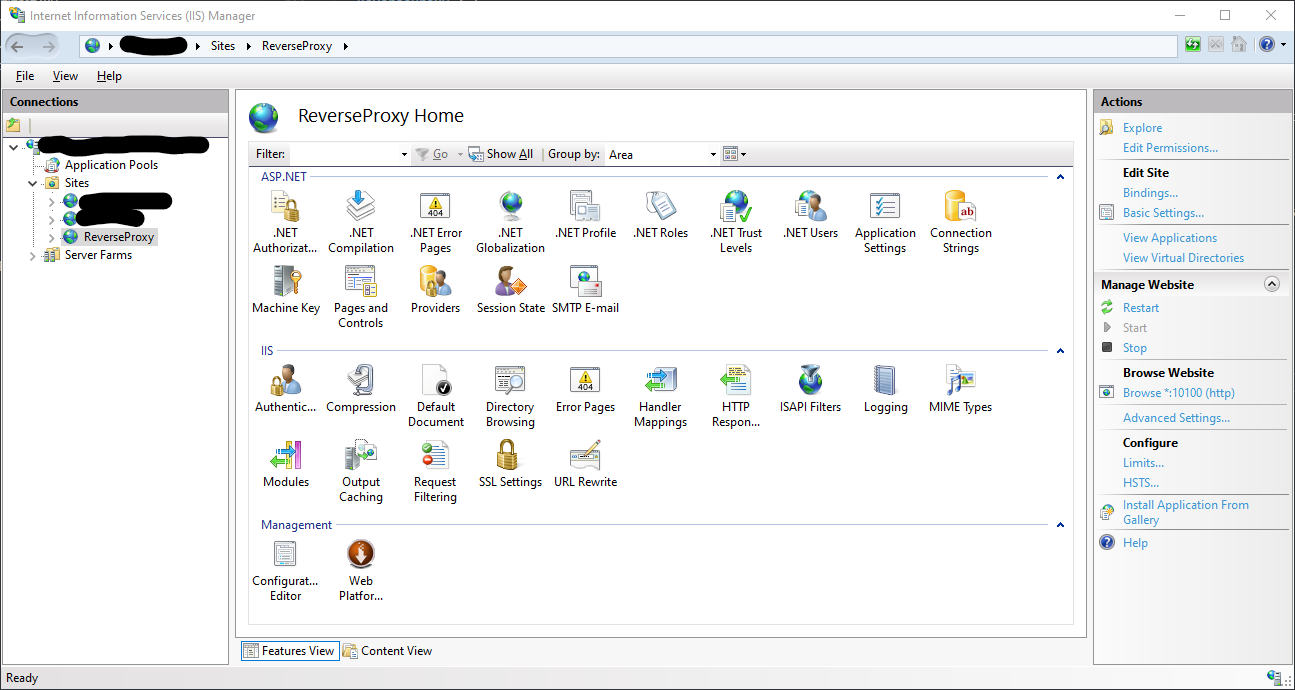
Go to the URL Rewrite section of the site and click on View Server Variables:
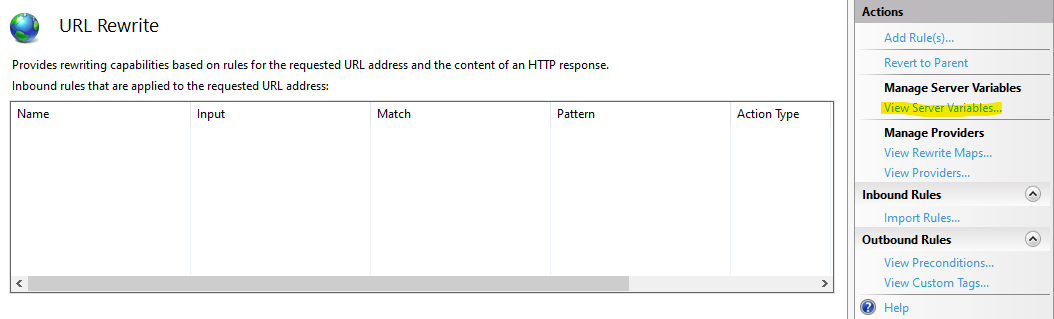
In this screen one can specify which variables to use when a rewrite rule has been triggered.
To whitelist the X-Forwarded-Host/Proto headers add the following variables as needed:
- HTTP_X_FORWARDED_HOST
- HTTP_X_FORWARDED_PROTO
In this case only X-Forwarded-Host was needed so HTTP_X_FORWARDED_HOST has been added as a server variable:

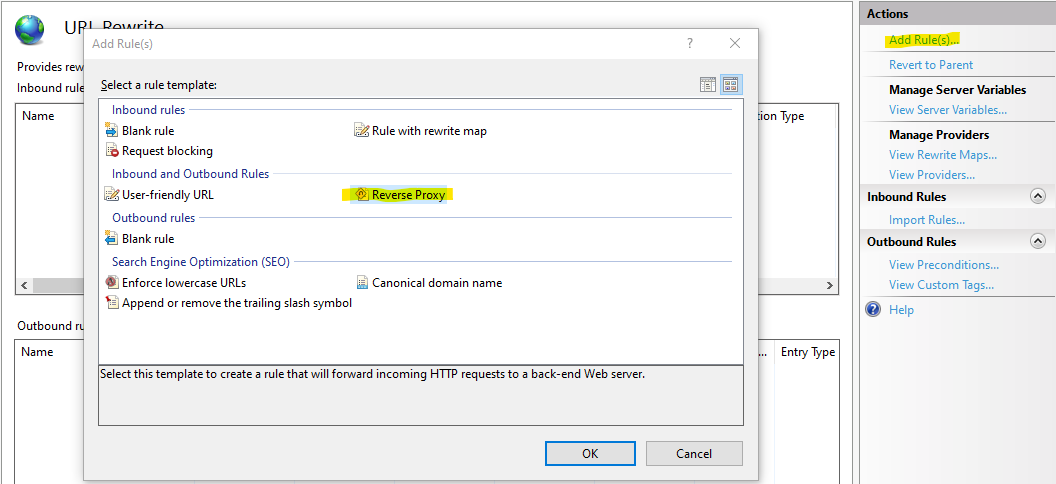
Go back to the URL Rewrite section and start adding a reverse proxy rule:
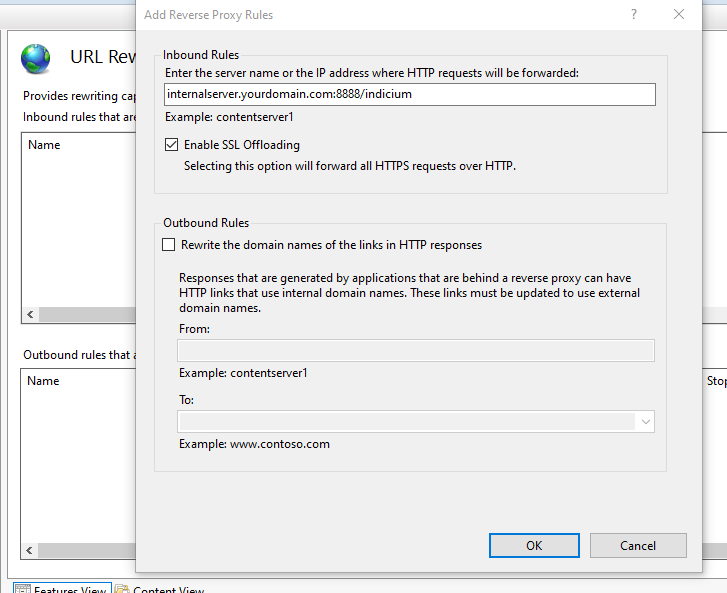
Configure the Inbound Rules section to point to your internal server running Indicium.
This values should contain the domain, port and virtual host path as needed but leave out the protocol.
In this example the domain is internalserver.yourdomain.com, the port is 8888 and Indicium itself is running on a virtual host application path called indicium.
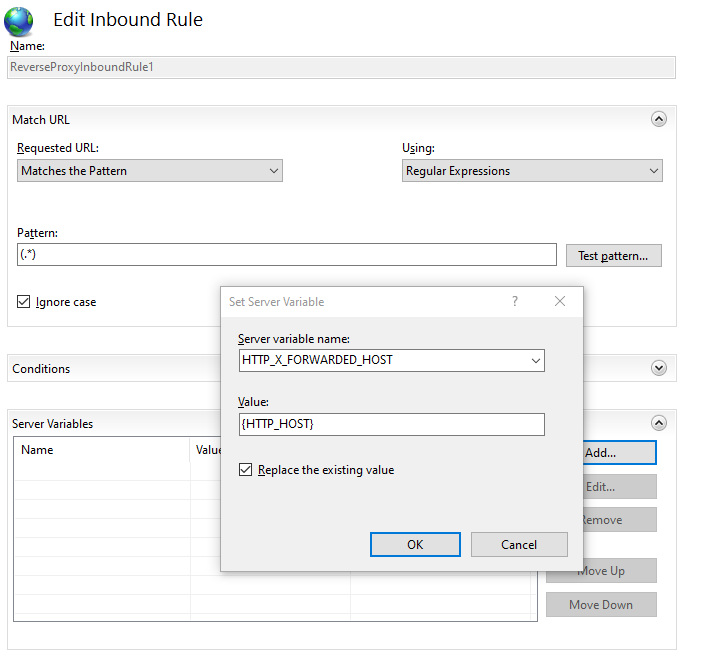
Once the rule has been added double click on it to start editing it once more.
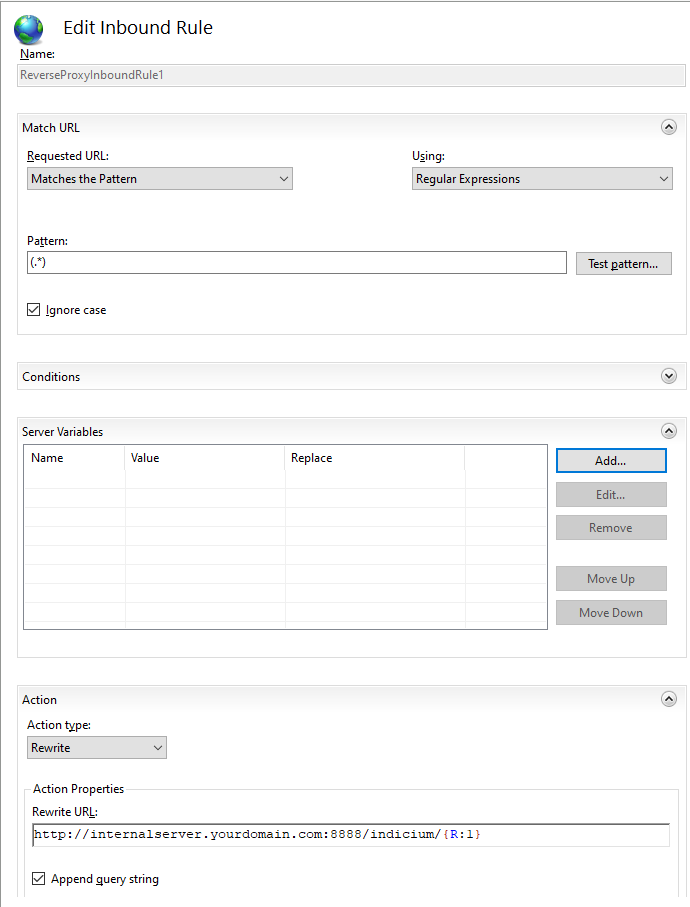
Configure the rule to use the HTTP_X_FORWARDED server variables that were added earlier.
This example only adds HTTP_X_FORWARDED_HOST and sets it to {HTTP_HOST} which will pass on the original host to the Indicium application.
Another common example would be when the reverse proxy is secured by https but all internal trafic is off loaded to http (e.g. when the SSL offloading option is checked in IIS).
In that case the Indicium server should be notified of this by adding the X-Forwarded-Proto header.
This would mean that the HTTP_X_FORWARDED_PROTO variable must be added as a server variable and set to https on the inbound rule section of the rewrite rule.
Troubleshooting issues
Startup errors
If the root URL of Indicium (e.g. https://server/indicium/) gives an error, then it will most likely state "An error occurred while starting the application"
and/or show error code 502.21. With version 2.0.6+ of the AspNetCoreModule for IIS, the error page should include the cause of the error, which is typically
informative enough to point you in the right direction. If not, then please follow the steps below in their stated order.
JSON
Ensure that the JSON in the appsettings.json is valid. The most common mistakes are forgetting to escape backslashes, either in the server address or the pool username, or forgetting a comma after a property which is not the last one.
If you want to be certain that the JSON is valid, then you can use this website to validate it (though it would be wise to clear any sensitive information first): https://jsonlint.com/.
Connection
Ensure that the information in the appsettings.json is correct. Double-check the server address and the database, and ensure that the Database Pool User has access to the configured IAM database and product databases.
Prerequisites
Double-check if the server has met the prerequisites mentioned in Prerequisites. Missing either of these would also cause this start up error.
Insufficient access to certificate store
The following error indicates insufficient access rights to the windows certificate store for the application pool identity.
System.Security.Cryptography.CryptographicException: The system cannot find the file specified.
Right click on your application pool and go into 'Advanced Settings' and make sure that the correct identity is set. Please note that 'Load User Profile' should also be set to True
Log files
Gather the log files in the Logs folder in the root of Indicium and send them to your point of contact at Thinkwise to receive further assistance.
401 - Unauthorized
If you are getting "401 - Unauthorized" results for a user (i.e., if the browser keeps prompting you to log in) and you are certain that the specified credentials are correct, then please check if the authentication method of the user is set correctly. In particular, when using domain credentials, the authentication method should be Windows, not RDBMS.
404 - Application not found
If an application URL (e.g.,https://server/indicium/iam/myAppl/) gives the result "404 - Application not found", and you are certain that the URL is correct, please ensure that the user that you are using to log in as has access to the application in IAM.
When accessing an application present in the Software Factory (e.g., https://server/indicium/sf/myAppl/), ensure the user logged on to Indicium has this application activated.
Running Indicium in Development mode
By default, Indicium will run in Production mode. In this mode, Indicium will limit the amount of information it sends to clients when database errors occur for security reasons.
As of version 2018.2.3, Indicium will also send the translatable database errors, such as primary key violations, to the client. These database errors were previously restricted to Development mode. This change should make it much less necessary to run Indicium in Development mode.
Production mode does not influence the amount of information that is logged to disk when errors occur. Indicium will always log all errors, whether related to the database or not, to the Logs folder in the root of Indicium.
If you want to run Indicium in Development mode, then you need to make the following changes to the Web.config file in the root of Indicium:

As convenient as it may seem to always run all instances of Indicium in Development mode, please do not do this. Only run Indicium in Development mode when you are actually developing and debugging problems or if Indicium is only accessible by trustworthy users.