
Data conversion
A very important step in the preparation for an upgrade is setting up version management for the data conversion. If version management is not applied correctly, this can ruin the database. In a best case scenario, the upgrade-script will fail and a back-up will have to be restored. Yet in the worst case, the upgrade will be carried out without an error message but with data being lost.
The data conversion screen has four tasks:
Refresh data conversion - deletes the generated records and the data conversion is re-built from that point
Amend previous version - amends the previous version of the project version. After this, a data conversion is created for the new upgrade
Delete data conversion table - deletes one record with the underlying columns
Delete data conversion - deletes all data conversions between two versions
The first step is to check the selected previous version. This ensures that the new version is created from the correct version. The data is converted to the new version on the basis of the correct version. When work is carried out with various branches and/ or several versions, it can be confusing which version is the correct version to use to create a new version. With the sf_product_info table in the database, it can be checked which version is correct.
Through the use of the Update previous version task, the previous project version and data conversion mapping can be converted. It is possible to define a mapping for various earlier project versions but as default only the mapping for the current previous version is shown.
Matching tables or columns
Data conversion will automatically attempt to match the old tables and new tables on the basis of nomenclature. If the match is successful, the from table ID and the to table ID will be filled, and the status will be set to Modified. When a table is renamed, the data from the old table must be added manually to the new table. This is done through the addition of the old table name to the from table ID in the new record and then updating the data conversion again. The matching will be updated and the old record will be deleted.
Splitting tables or columns
Sometimes a table has the same name as before but with a different function after the conversion. The data is therefore no longer correct and the new table will have to be empty after the upgrade. This is done through the deletion of the value from the from table ID and then updating the data conversion again. There is then a second table with the status Deleted.
Rebuilding tables
Even though nothing has changed, it can still be desirable to rebuild a complete table. When the structure of a table can no longer be guaranteed, it can be desirable to rebuild it.
Default values for new columns
After the tables and columns are matched, it is possible to set a default value for a column. The difference between the default value during the data conversion and the default value in the data model is that the default value of the data conversion is only used during the upgrade.
Squashing
When making a lot of small changes in different project versions, it can be desirable to combine these project versions into one version before upgrading to one new version. There is a task available to squash these changes in the data conversions.
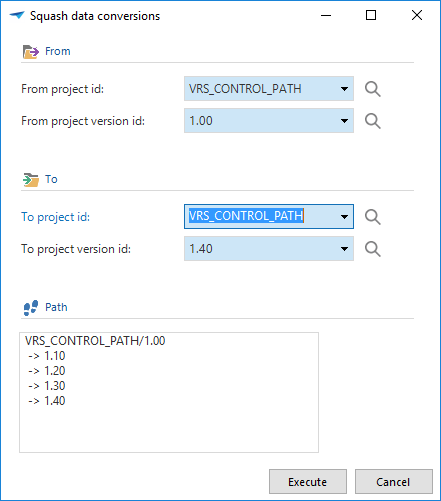 Squash data conversions
Consider the following example: In version 1.10, column x is renamed to y. In version 1.40, the same column is renamed to z. By squashing the data conversion between 1.00 and 1.40, the Software Factory will automatically rename column x to z.
Manual data conversion
The data conversion settings are intended for simple scenarios, where records are moved from one table to another or columns are filled using default values.
More advanced default values can be set using an expression. The default value of the column in version control must be set to =expression, for instance =dateadd(year, 2, getdate()).
For more complex scenarios, i.e. merging tables, changing primary keys, normalizing or denormalizing, manual scripts can be inserted into the upgrade process. This can be done using a control procedure with code group UPGRADE. There are various stages within the upgrade process where custom scripts can be placed. The stage depends on the program object a template is assigned to.
| Program object | Stage |
|---|---|
ug_before_upgrade_from_[x]_to_[y] | Before any upgrade code from version [x] to [y] has been executed |
ug_during_upgrade_from_[x]_to_[y] | After the data migration from version [x] to [y] has been done but before the old tables are dropped |
ug_after_upgrade_from_[x]_to_[y] | After the old tables from version [x] have been dropped when upgrading to version [y] |
Versions [x] and [y] in the name of the program object correspond to the configured version control base version and the current version. Because of this, the template will only have effect for this specific upgrade.
If there is manual code that needs to be run before, during or after every single upgrade, use one of the following program objects instead:
| Program object | Stage |
|---|---|
ug_before_upgrade_always | Before any upgrade code has been executed |
ug_during_upgrade_always | After the data migration has been done but before the old tables are dropped |
ug_after_upgrade_always | After the old tables have been dropped |
When using a manual template during the upgrade, you can refer to the old tables using __[tab_id]__.